
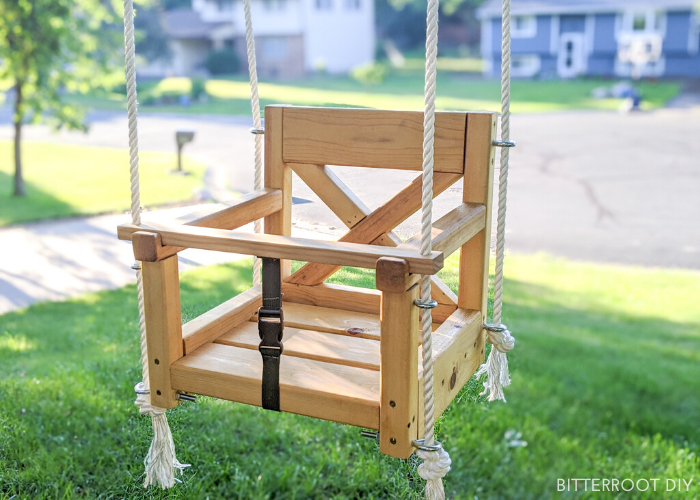
Build a DIY outdoor baby swing with these plans.

This post may contain affiliate links. If you make a purchase from one of the links, I may make a small commission at NO EXTRA COST to you. This helps keep the tutorials and plans free here at Bitterroot DIY. Thank you for your support! See my full disclosure here.
The other day, I joined a few of my friends over on Instagram to build some fun projects for our kids. I wasn’t sure what to do at first but decided last minute to put this little swing together and, let me tell ya, it was a BIG HIT with the kiddos! They’ve been swinging in it like crazy every day since I hung it up – I call that a WIN!
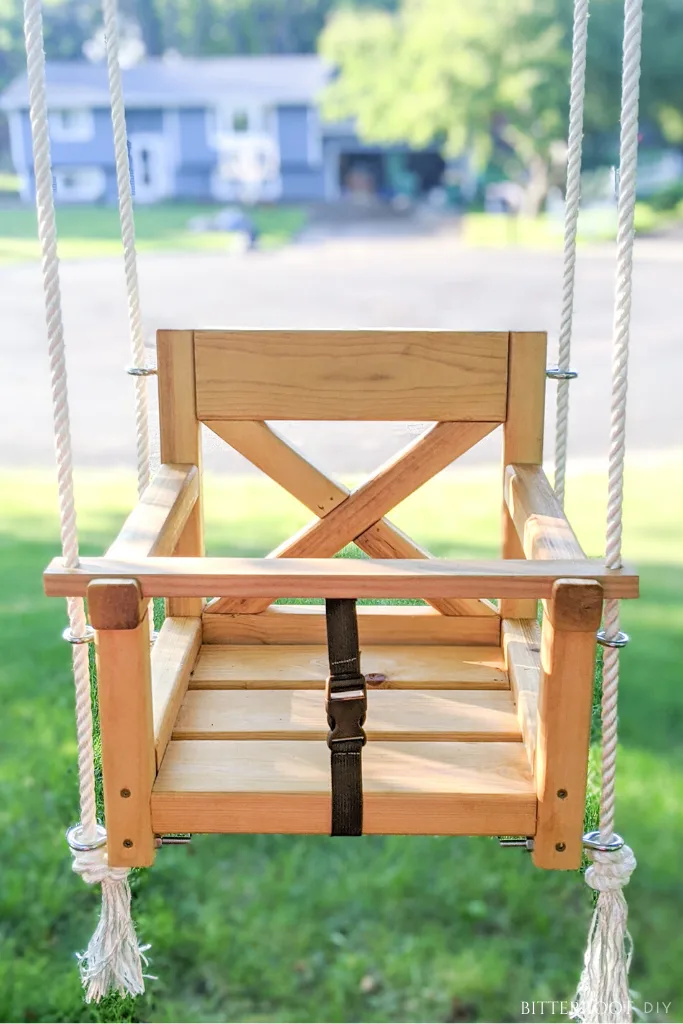
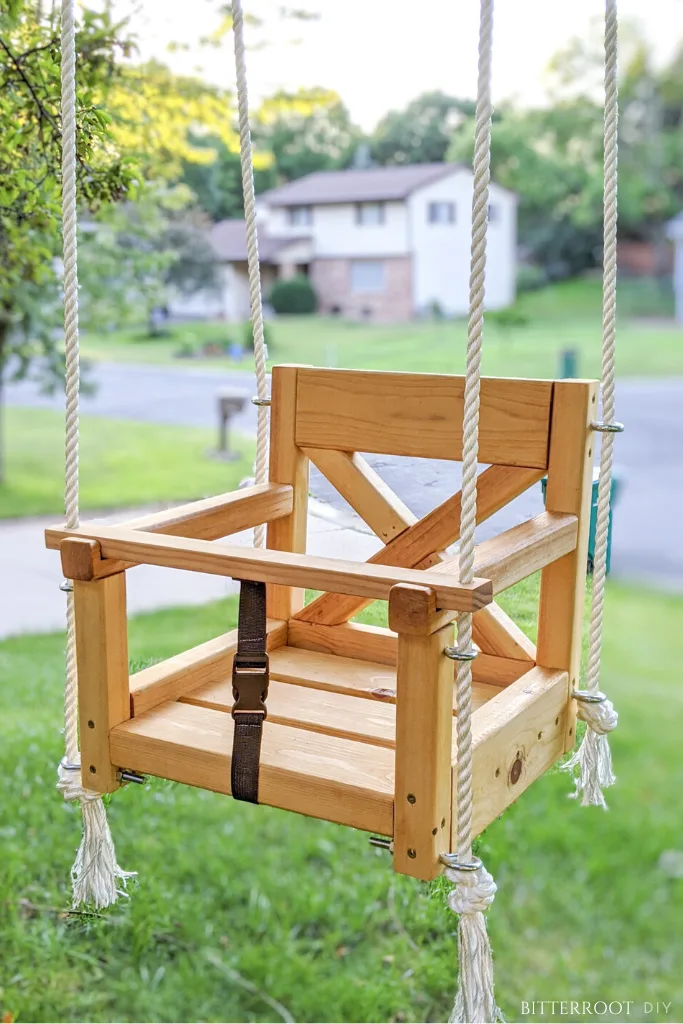
I built the DIY outdoor baby swing as a rope swing for a tree in our front yard, but it would also work great for a swing set. The seat is 12″ x 12″, so it’s a great size for babies to toddlers.
Enjoy the plans!
- Miter Saw
- Orbital Sander
- Drill
- Finish Nailer
- 1/2″ Rope
- 4 1/2″ Eye Lag Screws
- 2 3/16″ Screw Eyes
- 2″ Finish Nails
- 2 1/2″ Exterior Wood Screws
- Cabot Timber Oil in Natural
- Wood Glue
- Tape Measure
- Pencil
- Safety Glasses
- Ear Protection
The lumber and cut lists are available for purchase. Your purchase also includes a downloadable PDF of the plans. If you prefer, the plans are available in the post below – you simply have to calculate the lumber and cut lists yourself.
-
 DIY Outdoor Baby Swing$0.99
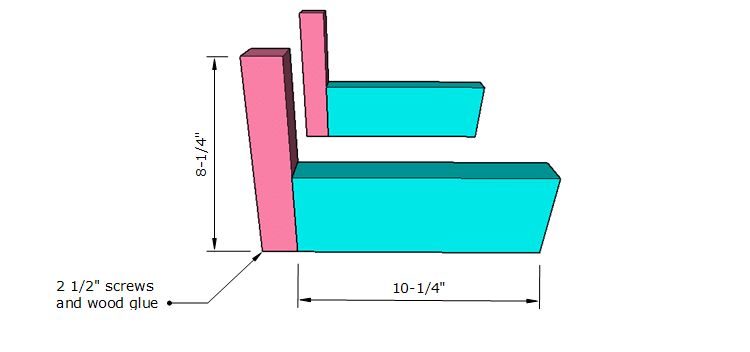
Step 1.
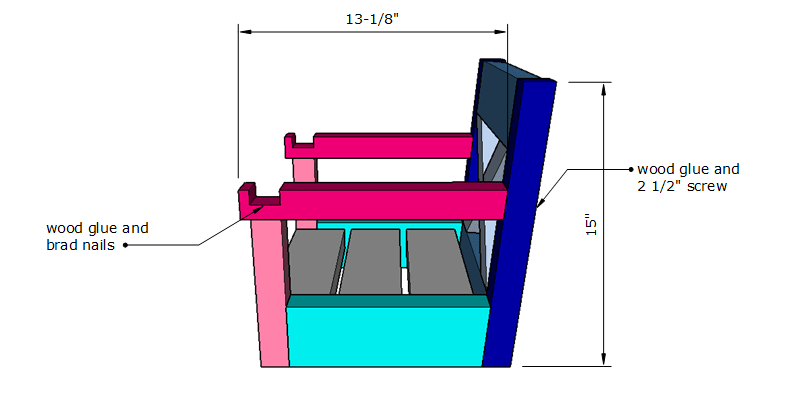
Build the back of the seat as shown above. Use wood glue and 2 1/2″ screws. You can use pocket holes along the back if you want to, or just countersink screws right through the sides of the 2x2s into the 2x4s (that’s what I did).
Because the 2x2s are cut at an angle, the 2x4s won’t line up exactly flush with the top.

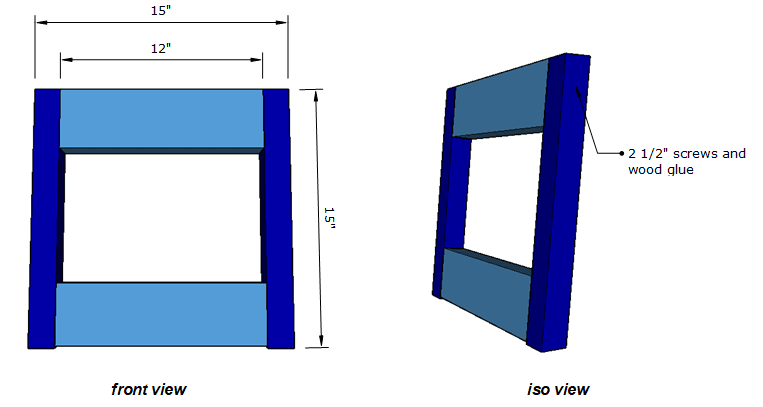
I just positioned the 2×4 flush with the shorter side and called it good. Here’s a close-up to try to show what I mean:
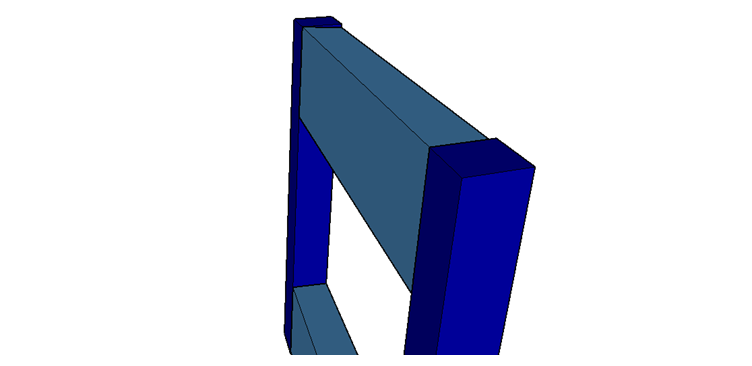

You could also just opt to cut the 2x2s straight off (no miter). I cut them at a miter so the bottom of the boards line up flush with the seat. It’s up to you. Since the seat hangs in the air, it doesn’t really matter if the bottom is flat.
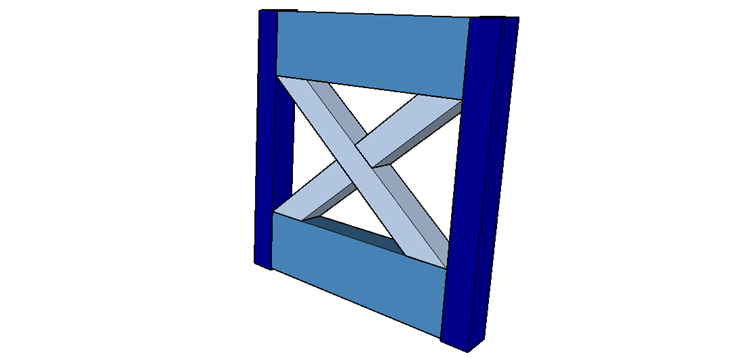
Step 2.
Cut the X back to fit. Simply place a 2×2 under the frame you built in Step 1, line it up on both corners, and trace where to make the cuts. Start with 2×2 that runs all the way across the frame, cut, and attach it. Then place another 2×2 under the frame, line it up with the corners, trace the angle at the corners, as well as where it intersects the full length cross piece in the middle. Make the cuts and attach it.
Use wood glue and finish nails (driven at an angle) to attach the cross pieces to the frame and to each other at the center.

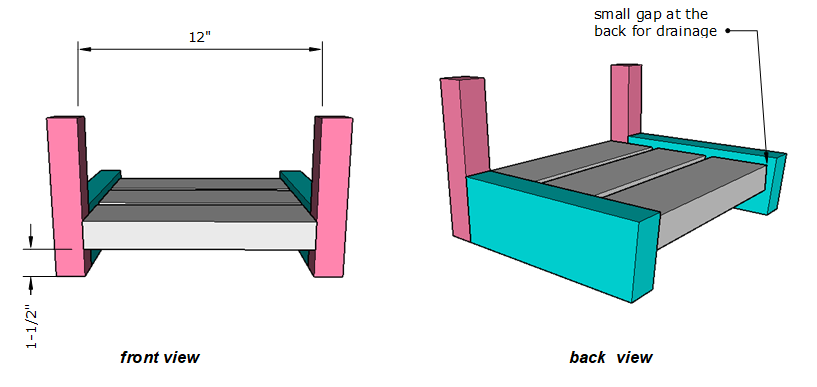
Step 3.
Assemble the front arms and bottom of the seat as shown. Use wood glue and 2 1/2″ screws. Again, you can use pocket holes here if you want, but I just drove screws through the front of the 2x2s into the 2x4s.

Step 4.
Attach the seat slats to the frames you built in Step 3. Position the first slat flush with the front arms, then space them 1/2″ apart and work your way to the back of the seat. This will leave a small gap at the back between the back slat and the seat back for water drainage.
I attached the seat slats about 1″ down from the top of the sides. Feel free to adjust that to your liking.
Use wood glue and 2 1/2″ screws to attach the slats.

Step 5.
Attach the back to the seat with wood glue and 2 1/2″ screws.
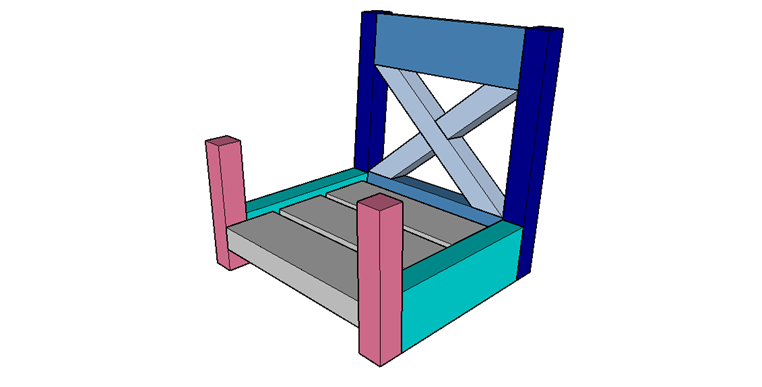

Step 6.
Attach the arms to the chair. I used wood glue and one 2 1/2″ screw through the back frame into the arm and 2″ brad nails at the front to attach them.

**Optional: feel free to cut half laps on the front of the arms so the front guard sits flush with the arms. If you don’t feel comfortable cutting half laps, don’t worry about it. The front guard can just sit right on top of the arms.


Center the front 1×2 guard and mark the location where the rope will run through it on either end. Use a 1/2″ forsnter bit to drill holes on each end of the 1×2.
Step 7.
Sand and finish the chair with an outdoor wood finish.

I used Cabot Timber Oil in Natural. This is my first time using it, but so far it seems like a great product! It went on easily and sealed the wood really well. We had a HUGE rain storm here the other night and there’s no signs of water seeping into any joints or end grain or anything.
Once the finish is dry, attach hardware to hang it. This is up to personal preference and what you feel comfortable with your kids swinging in, but I’ll share what I did. Please test the swing before putting a child in it.
I used two 4 1/2″ Eye Lag Screws on the seat back at the top and bottom of the frame (for a total of four eye lag screws), 2 3/16″ Screw Eyes on the top of both front arms, two eye bolts through the bottom of both front arms, and 1/2″ rope. There’s probably more hardware in some spots than actual lumber haha! But, hey, no kids will be falling out of the tree!

If I did it again, I think I’d skip the bolts on the bottom of the front arms and just use another pair of 2 3/16″ Screw Eyes, but the bolts worked out just fine. You just have to make sure to stagger the bolts correctly so they don’t run into any of the screws you used to put the frame together.
Alright, there you have it – a DIY outdoor baby swing!
Please let me know if you have any questions and I’ll get back to you as soon as possible.


Thanks for stopping by!
For more project ideas, you can find me on Pinterest. And to stay up to date with the latest shenanigans, follow me on Instagram.


Jim Isaac
Sunday 27th of June 2021
This is great idea and very easy, unless you have a mental or physical disability, you can definitely put this together yourself and do not need the expert assembly. Great work and instruction. We had wood tree swings from treeswingstore.com as well that is super easy to install.
Megan
Saturday 10th of April 2021
My husband made thus swing and it's just too cute! The X back design matches the adult rockers that we have on the porch so we would like to modify these plans to make a child's rocker. Any ideas how to make the actually rocker part??
tylynn_sattler
Monday 12th of April 2021
So glad you love it! I've seen people make rockers quite a few different ways, so I'd recommend googling it to find ideas and then just build the top the same as this swing design. A few things I've seen for rockers - cut the rounded shape out of plywood or buy a wide board (like 1x10 or 1x12) and cut the curve out of that. You can use a jigsaw to cut the curve and then sand it smooth.
Hope that helps! Good luck!
Caitlin
Tuesday 27th of October 2020
Is there any way to attach the X board to the back without the finish nailer and nails? I'm making this for my nephew and I live in an apartment so I'm limited to what all I can use. I'm good with everything else, but I wouldn't be able to get a nail gun. Would I be able to screw them in with pocket holes? That I have, lol. I'm just not sure how well that would work out in the end?
tylynn_sattler
Wednesday 28th of October 2020
Yeah you should be able to make it work with pocket holes! I've done that before 😊
Nancy Daniel
Friday 9th of October 2020
Have a question. - I just bought the plans and I read the blog but I didn’t see on either one where it talks about the space left on the bottom sides where it looks like the seat is lower than the top of the 2x4 sides. How much room did you leave between the top of the seat 2x4 pieces and the top of the side 2x4 pieces.? Thank you! Nancy
tylynn_sattler
Thursday 15th of October 2020
Sorry I forgot that dimension! I attached them about 1" down from the top of the sides (close to centered). I just wanted to leave enough room to attach the bolts for hanging.
AJ
Wednesday 19th of August 2020
My husband is so proud of this!!! We love your site. He now wants to make us 2 swings next to our baby's. :) Very cute and very fun! Thanks for having such a great variety of DIY items.
tylynn_sattler
Saturday 22nd of August 2020
That's awesome! Thank you so much for using my site - I really appreciate the support!