
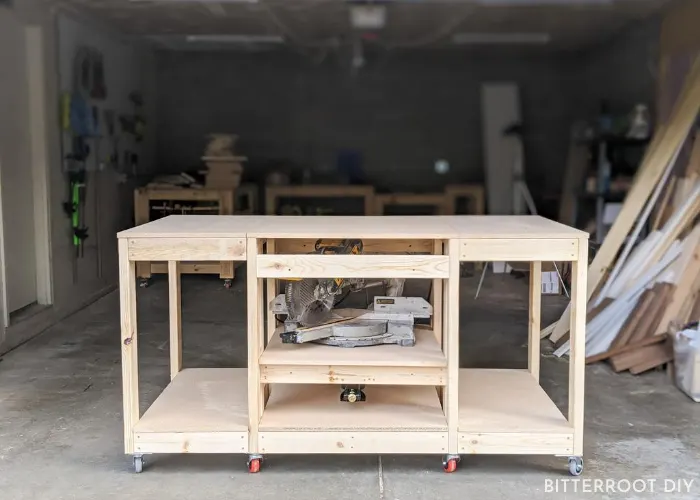
Build a DIY workbench with hideaway miter saw for your shop.
Head to my new YouTube channel for the full video on how I put this workbench with hideaway miter saw together. And don’t forget to SUBSCRIBE while you’re there to see lots more how-to videos.

This post may contain affiliate links. If you make a purchase from one of the links, I may make a small commission at NO EXTRA COST to you. This helps keep the tutorials and plans free here at Terrace Place. Thank you for your support! See my full disclosure here.
Another workbench in the shop, and this time it’s an all-in-one unit!
A few weeks ago, I got a special request over on Instagram for a workbench that could store a 12″ Sliding Compount DeWalt Miter Saw. Let’s be honest – it’s not a saw you really want to be lugging around to this side of the shop and that all the time. It’s kinda a bear to move. Now, there are quite a few flip-top workbench options out there, but they leave the saw hanging upside down when it’s not in use. This follower was looking for an alternative that didn’t leave the saw hanging all the time since it’s so heavy.
Enter – RV scissor jack.
If you purchase the same jack I did (the one linked), you’ll notice that it’s a set of two. You only need one for the workbench, but it wasn’t that much more expensive than the single jacks and included all the mounting hardware, drill bit, and manual handle. So I just bought the set.
Enjoy the plans!
**If you find any errors in the plans, please let me know and I’ll update them accordingly. I do my best to get everything correct, but it’s just me back here behind the screen checking my own work.
- Scissor Jack
- Six 3″ Locking Casters
- Four 1/4″ x 6″ Carriage Bolts
- Four 1/4″ Wing Nuts
- Four 1 1/2″ Hanger Bolts
- Z Clips
- Miter Saw
- Circular Saw or Table Saw
- Drill
- Tape Measure
- Clamps
- Level
- Speed Square
- Pencil
- Safety Glasses
- Ear Protection
- 2 ½” Screws
- 1 ¼” Screws
The lumber and cut lists are available for purchase. Your purchase also includes a downloadable PDF of the plans. If you prefer, the plans are available for free in the post below – you simply have to calculate the lumber and cut lists yourself.

Step 1.
Build the top side frames as shown. Use two 2 1/2″ screws in each end of the 2x4s to attach them.


Step 2.
Build the middle shelf for the miter saw as shown. Line the middle two 2x4s up with the bottom of the frame. You’ll attach the scissor jack to these later. Use two 2 1/2″ screws into the end of each 2×4 to attach them.


If you want extra strength, feel free to use 4x4s in the center of the frame instead of 2x4s. I just used 2x4s as shown above.
Step 3.
Attach the legs to the top side frames. Position them flush with the top and outside edges of the frame. Note
that the notched legs face outward (they’ll sit on the bottom frame in Step 5). It’s easiest to flip the frame upside
down and use your workbench (or floor) as a level surface to make sure the legs are flush with the frame. Use 2 1/2″ screws through the legs into the frame to secure them.


Repeat for the other side frame.


Step 4.
Build the bottom frame and use two 2 1/2″ screws in the ends of the boards to secure them.
Make sure the first inside boards are positioned correctly (at 1′ 3″ inside to inside) so the legs will attach at the correct position. Center the middle 2×4.
Attach the small 2×4 blocks to the sides of the center 2×4. You’ll attach the casters to them in Step 8.


Step 5.
Line the side frames up over the bottom frame and attach the legs to the frame with 2 1/2″ screws. Drive screws from the inside of the frames into the legs so they won’t get in the way of the next boards in Step 6.


Step 6.
Attach a second set of legs to the inside of the side frames. Space the legs 1 1/2″ apart to form a “track” to hold
the miter saw shelf frame in place as it moves up and down. Make sure the legs are all perfectly square and use
a scrap 2×4 to help position the legs correctly so the shelf will slide up and down easily.
Use 2 1/2″ screws to secure the legs to the frame.


Step 7.
Attach 2x4s on the inside of the frames to secure them. Use 2 1/2″ screws through the frame boards into the legs to attach them.


Step 8.
Measure the height of the tabletop on your miter saw. Attach the middle 2x4s to the frame so the miter saw
tabletop sits flush with the top of the side tabletops when the saw is in cutting position. Use 2 1/2″ screws to attach them to the legs.


The tabletop of my miter saw sits at 3 1/2″ so I placed the 2x4s at 2 3/4″ from the top of the legs (3 1/2″ (height of saw tabletop) – 3/4″ (thickness of plywood) = 2 3/4″). When the miter saw shelf is in cutting position, the top of the miter saw table is flush with the sides so the boards sit flush across the saw and workbench.
Step 9.
Attach the locking casters to the bottom of the workbench. Depending on what casters you buy, you may have to use washers with the screws so the screws don’t just go through the attachment points on the casters (or use
washer head screws). I used washers and 1 1/4″ screws to attach the casters.


You’ll notice the location of the casters is a little different in these plans than what you see in the photos. I updated the plans so the bottom frame is one solid 2×4, rather than three separate ones. This makes for an all-around stronger workbench and you only need six casters, instead of eight. If I re-did the workbench, I’d build it this way.
Step 10.
Secure the bottom shelves to the bottom frame with 1 1/4″ screws. Countersink the screws so they don’t get in the way of things on the shelves.


Step 11.
Center the scissor jack on the middle bottom shelf and attach it with the included bolts. Once the jack is secure, insert the middle shelf frame into place and attach it to the scissor jack along the bottom 2x4s. The front and back 2x4s of the frame should slide inside the “track” formed by the legs.


Center the plywood (or particleboard) over the shelf frame and secure it to the frame. It should overhang the
frame in the front and back by 1 3/4″.
It’s very important that everything is square and level so the shelf will slide. Double check that it slides before
securing it to the jack.
Here’s a view with the shelf extended to cutting position:


And a view from the bottom so you can see where the jack is attached to the 2×4 frame. Again, if you want extra
support, you can use 4x4s in the center of the frame rather than 2x4s. I just used 2x4s, as shown:


Step 12.
Attach the side tabletops to the frame with 1 1/4″ screws. Countersink them so the work surface is perfectly flat. Note that the tabletops line up flush with the outside of the legs and leave the top of the inside legs exposed.


Step 13.
Place the middle tabletop on top in place on top of the inside legs.


Drive hanger bolts through all four corners of the middle tabletop into the legs. Predrill through the tabletop
plywood (or particleboard) with a bit large enough that the tabletop can slide on and off the hanger bolts. Pre- drill into the tops of the legs with a smaller bit so the hanger bolt stays threaded in the tops of the legs.
The hanger bolts secure the middle tabletop in place when you want to use the bench as an assembly table.
I used #10-24 x 1 1/2″ hanger bolts. Drive the bolts far enough into the legs so they don’t stick out above the
plywood. Here’s a real-life view of them:


Step 14.
I’m always honest with my work, so I will tell you ahead of time that the scissor jack is not perfectly rigid. There is a little wiggle in the shelf as it cranks up and down. HOWEVER – I added four carriage bolts to lock it in place when it’s in cutting position. The carriage bolts lock it in the correct spot so you can safely make cuts.
To put the carriage bolts in:
Raise the shelf to the correct height and ensure it is level and that the miter saw tabletop is flush with the side tabletops. When it is in the correct position, pre-drill and insert 6″ carriage bolts through the front frame into the miter saw shelf frame. Secure them with wing-nuts. You’ll probably need an extra long bit or drill bit extension to be able to drill all the way through both frames. They are available on Amazon or at your home improvement store.


This particular scissor jack is rated to 5000lb, so there’s no danger of the saw falling or anything, but you don’t want any movement when you’re making cuts.
Here is a view of the bolts coming through the back as well (circled in red):


Since the jack and 2x4s aren’t perfectly rigid, you have to crank it up and down kinda slowly so it doesn’t get off-kilter and jam in the 2×4 track system. Honestly, I think the only way to get a perfectly rigid system would be to weld a metal frame and track system. I wanted to keep things as simple as possible here and just use framing lumber.
For a workbench make out of 2x4s and a scissor jack, I’m VERY HAPPY with it. But it slides about how you imagine 2x4s slide against 2x4s. If you want, you could look into making a nicer track system, but this gets the job done. Even though it’s a little rough, the thing ain’t gonna break – I can tell you that for sure. That jack is crazy solid.
Step 15.
Lastly, attach z-clips to the outside of the legs on one side of the workbench and to the bottom of the middle
tabletop.


When the middle tabletop is not in use, you can hang it on the side of the workbench on the clips.


And there you have it!
Here’s a view with the saw in cutting position:


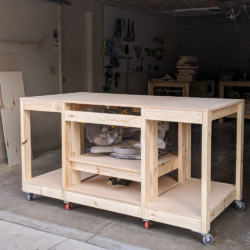
And then hidden away:


Overall I’m super happy with how it turned out and think it makes for a great alternative to a flip-top bench.
I’d love to see your take on this DIY workbench, so definitely tag me in your builds over on Instagram @terrace.place or shoot me an email at atterraceplace {at} gmail.com!
Please let me know if you have any questions and I’ll get back to you as soon as possible.
| Tylynn |
Thanks for stopping by!
For more project ideas, you can find me on Pinterest. And to stay up to date with the latest shenanigans, follow me on Instagram.


Julie H
Saturday 16th of January 2021
OH MY GOODNESS THIS IS HUGE!!! lol. But, I love it. Being able to move it around gives me access to the whole table top. And it is very sturdy. So glad I made this. Thank you!!!!
tylynn_sattler
Monday 25th of January 2021
Haha yes it is! But it's a great use of space ;)
Ryan
Sunday 10th of January 2021
Bought the plans and am excited to make this! Found a 'replacement scissor jack' on Amazon that appears to be an individual of the same model that you recommended in the 2-pack. It's not clear whether or not it comes with the mounting bolts though, any chance you have the specs for the bolts used to mount the scissor jack? Thanks!
tylynn_sattler
Monday 25th of January 2021
I don't have the specs for the bolts, but it'll depend on the size of the pre-drilled holes in the jack you got. Sorry about that!
Mike Mullins
Saturday 9th of January 2021
Hey what a great project! Been looking how to build a table to mount a Sears radial arm saw that a friend gave me. He found the saw at a habitat for humanity and bought it for only the stand for his 6" router he got at an estate sale I think. I printed your plans and I'm going to explore your great idea to see if it could work for me. Thanks for putting this out and as always have a safe journey in all the projects you build.
tylynn_sattler
Monday 25th of January 2021
Thanks! Good luck with the project!
Jill Dalton
Saturday 9th of January 2021
I might have made the middle shelf thicker or added a strong board to the shelf to attack the scissor jack to. ( Possible might not wobble as much )
Mark
Sunday 27th of December 2020
Just curious as to what a rough estimate of cost would be for all of these materials? Got the tools, just not the space, so this would be prefect in my garage!
tylynn_sattler
Thursday 7th of January 2021
Hi Mark,
Unfortunately, I do not give cost estimates since the price of materials can fluctuate so much depending on your location.